How To Overclock AMD Ryzen CPUs
Overclocking Options
Overclocking through Windows is convenient, but we still prefer locking in new settings through the BIOS. This is doubly important, we think, when it comes to a brand new platform like AMD’s Ryzen.

What follows are the most notable settings from our Asus board’s BIOS:
- Ai Overclock Tuner: Set this to manual for access to reference clock adjustments, or set it to D.O.C.P. to pick a memory overclocking profile (related parameters are adjusted automatically).
- BCLK Frequency: We’ll come back to this very important setting later in the article. It can be adjusted from 85 to 145 MHz, according to the settings. By default it should be near 100 MHz, but we have recommendations of our own.
- CPU Core Ratio: This is a multiplier used to determine the processor frequency. Raise it to overclock your CPU. Be careful, though. When the ratio is not set to Auto, AMD’s XFR technology is deactivated. The processor switches automatically to overclocking mode and all power-saving features are deactivated. It is adjustable in increments of 0.25x.
- Memory Frequency: System memory frequency, from 1333 to 3200 MT/s. You can go even further using the BCLK Frequency field. This is a very important parameter for optimizing performance, and we’ll go into more depth on it shortly.
- SMT Mode: Simultaneous Multi-Threading is similar to Intel’s Hyper-Threading. Be careful; we had trouble with our motherboard when this option was set to Activated. Leave it on Auto; SMT will still be activated and you won’t run into the bugs we did.
- CPU Core Voltage Override: This allows you to regulate your processor’s core voltage. Asus advises against exceeding 1.4V. AMD recommends a 1.35V maximum voltage for long-term overclocks, and although the company says Ryzen can withstand 1.45V, longevity may be affected.
- DRAM Voltage: Raising the RAM voltage can help stabilize an overclock. A value of 1.35V is generally sufficient. For lofty overclocks coupled with aggressive timings, this can be raised up to 1.8V without additional cooling if you’re using Samsung B-die chips.
- PLL Voltage: We recommend manually locking this to 1.8V. If you leave it set to Automatic, there’s a risk that your motherboard will raise it, resulting in a temperature increase. It’s a useful knob to have when overclocking under liquid nitrogen (notably for the RAM).
If you click on the External Digi+ Power Control sub-menu, you get these options:
- Load-line Calibration: According to our testing, Level 1 yields the best results.
- CPU Current Capability: To avoid overclocking limitations, we recommend raising this to 140%.
As a reminder, LLC helps stabilize the core voltage under taxing CPU loads. When the processor is at rest (idle), it consumes little energy; therefore, the 1.35V it needs is easily supplied. Once the workload intensifies, though, voltage drops a bit (to 1.3V, for example). Obviously this is not good for stability. Motherboards equipped with load-line calibration functionality can increase core voltage under load to offset this effect.
Оптимизация Zen 2: как работает ClockTuner for Ryzen (CTR) (обновление)
 Несколько недель назад была анонсирована утилита ClockTuner for Ryzen (CTR). С сегодняшнего дня она доступна для всех желающих бесплатно. Разработчик утилиты Юрий Бублий (ник 1usmus) известен другой программой DRAM Calculator for Ryzen. Кроме того, специальный план энергопотребления позволял достичь более высоких тактовых частот Boost в ранних версиях BIOS, что позволяло раскрыть потенциал производительности. Такую же цель преследует CTR.
Нынешний дизайн чипов облегчает для AMD задачу выпуска продуктов, соответствующих разным стратегиям. Те же кристаллы CCD могут использоваться в различных процессорах. Но подобная гибкость оставляет и незадействованный потенциал, конечно, если есть потребность выжать максимум.
Если верить 1usmus AMD выставляет слишком высокие напряжения и неоптимальные параметры Package Power Tracking (PPT). Утилита ClockTuner for Ryzen выполняет автоматический андервольтинг на уровне отдельных CCX. Что позволяет процессору работать в более эффективном окне – на более высоких тактовых частотах и с меньшим энергопотреблением. Конечно, AMD может выполнить подобную калибровку самостоятельно. Но это увеличит издержки, а также усложнит сегментацию продуктов.
Требования для работы ClockTuner for Ryzen
Но перед тем, как вы приступите к исследованию потенциала своего процессора Ryzen, следует подготовиться. Имеются определенные требования по операционной системе, аппаратному обеспечению и настройкам BIOS.
- Windows 10 Bit 64 Build 1909 до 2004
- AMD Ryzen на архитектуре Zen 2 (процессоры Renoir пока не поддерживаются)
- BIOS с AGESA Combo AM4 1.0.0.4 (или более поздней)
- .NET Framework 4.6 (или более поздняя)
- Ryzen Master 2.3
Ниже приведен список процессоров, поддерживаемых CTR:
| Процессор | Совместимость | Дополнительная оптимизация |
| Ryzen Threadripper 3990X | ✗ | ✗ |
| Ryzen Threadripper 3970X | ✓ | ✗ |
| Ryzen Threadripper 3960X | ✓ | ✓ |
| Ryzen 9 3950X | ✓ | ✗ |
| Ryzen 9 3900XT | ✓ | ✓ |
| Ryzen 9 3900X | ✓ | ✓ |
| Ryzen 9 3800XT | ✓ | ✓ |
| Ryzen 7 3800X | ✓ | ✓ |
| Ryzen 7 3700X | ✓ | ✓ |
| Ryzen 5 3600XT | ✓ | ✓ |
| Ryzen 5 3600X | ✓ | ✓ |
| Ryzen 5 3600 | ✓ | ✓ |
| Ryzen 5 3500X | ✓ | ✗ |
| Ryzen 5 3500 | ✓ | ✗ |
| Ryzen 3 3300X | ✓ | ✗ |
| Ryzen 3 3100 | ✓ | ✗ |
В BIOS должны быть выставлены следующие настройки:
- CPU Voltage – Auto (BIOS)
- CPU Multiplayer – Auto (BIOS)
- Память должна работать на стабильных частотах или XMP
- SVM Mode (Virtualization) – disabled (BIOS)
Также следует выставить дополнительные настройки, специфичные для каждого производителя материнской платы. Например, это касается Load Line Calibration:
- ASUS: LLC 3 или LLC 4
- ASUS: Phase mode – Standard
- ASUS: Current capability mode – 100 %
- MSI: LLC 3
- Gigabyte: Turbo (Auto также возможен)
- ASRock: Auto или LLC 2
- Biostar: Level 4+
Наконец, следует скачать ClockTuner for Ryzen и тестовый пакет Cinebench R20. В папку с утилитой CTR следует добавить Cinebench R20 в каталоге CB20. В этот каталог нужно установить Cinebench R20.
Как работает ClockTuner for Ryzen
Утилита ClockTuner for Ryzen разработана, чтобы любой пользователь процессора Ryzen на архитектуре Zen 2 мог получить максимальную эффективность. CTR работает полностью автоматически, системы защиты отслеживают каждый шаг, поэтому какой-либо вред компонентом нанести невозможно.
CTR оценивает качество каждого CCX. Для проверки стабильности используется Prime95 со специальными настройками. Алгоритм выполняет поиск наиболее стабильных частот для всех CCX, чтобы они работали в пределах окна эффективности. После чего выполняется оценка производительности, используя тест Cinebench R20.

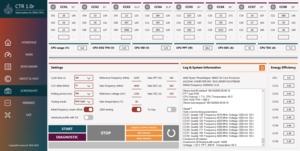

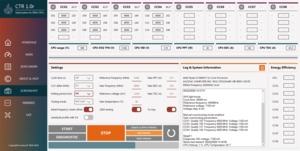
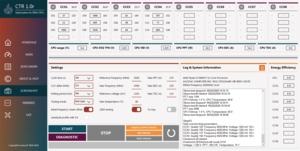
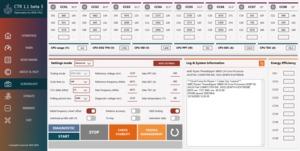
Вкладка “Main” обеспечивает наиболее важную информацию о процессоре. Отображаются разные напряжения, тактовые частоты, температуры и многое другое. Здесь важен индикатор производительности (CPPC). Его Windows сообщает через MMU процессора, указывая на самые быстрые ядра. Чем выше значения, тем с более высокими частотами должны работать ядра.
Ниже можно вносить некоторые настройки. “Cycle Time” определяет, как долго должен выполняться стрессовый тест. Чем выше данное значение, тем более точным будет результат. Но и время, которое будет потрачено на получение результата, тоже будет больше.
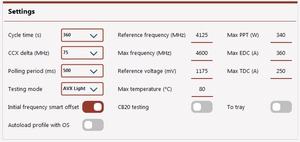
“CCX Delta” указывает на разницу между лучшим и худшим CCX. Каждый процессор Ryzen имеет разные спецификации, которые учитываются CTR. Для процессоров Ryzen 5 и Ryzen 7 рекомендуется выставить 25 МГц, для всех моделей Ryzen 9 – от 150 до 175 МГц, а для процессоров XT – от 100 до 150 МГц. У процессоров Ryzen Threadripper дельта CCX должна составлять от 75 до 100 МГц.
Третий важный параметр – “Testing Mode”. Здесь следует выбрать “AVX Light” для стандартных приложений. Соответственно, будут проведены тесты Prime95 с данными настройками. Для процессоров Ryzen 3900X, 3900XT, 3950X, 3960X и 3970X следует выбрать “Initial frequency smart offset”, чтобы сэкономить время. В таком случае некоторые настройки будут выбраны, исходя из известных значений CPPC.
Параметры “Reference frequency” и “Max frequency” используются для отображения максимальной и базовой частот Boost. Оба значения выставляются с шагом 25 МГц. Начиная со значения “Reference voltage”, выполняется андервольтинг с шагом 6 мВ. Для Ryzen 3600XT, 3800XT и 3900XT не следует выставлять напряжение выше 1,25 В.
Параметр “Polling period” указывает на интервал, через который опрашиваются сенсоры. Параметр “Max temperature” указывает на температуру, выше которой не должен нагреваться CPU. Наконец, отметим спецификации “Max PPT”, “Max EDC” и “Max TDC”.

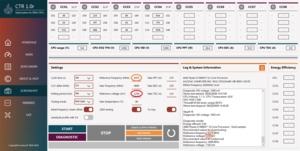
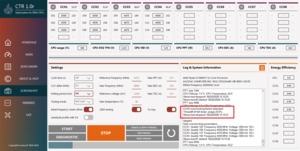
Через меню диагностики можно оценить потенциал процессора. И на основе диагностики выставляются начальные настройки. После нажатия кнопки “Start” будут выполнены непосредственно сами тесты, а также выполнен алгоритм подбора частот, использующий заданные настройки.
В окне информации приведены все сведения о текущем тесте. После успешного прохождения тестового прогона, настройки разгона и андервольтинга можно сохранить в профили. При необходимости они могут подгружаться при старте Windows.
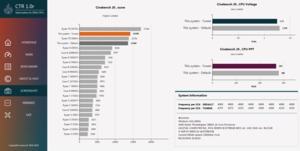
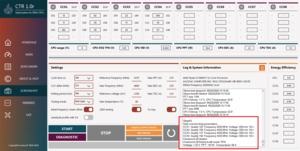
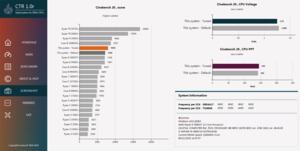
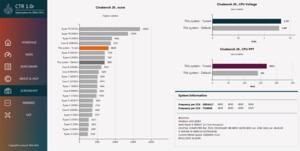
На вкладке “Benchmark” приведены результаты тестов. Они включают результаты Cinebench R20 в баллах, а также выставленные напряжения и полученные частоты для каждого кластера CCX.
Первые результаты
К сожалению, пока у нас нет возможности провести тесты ClockTuner for Ryzen в нашей лаборатории. Но 1usmus привел результаты на основе процессоров, имеющихся в его распоряжении. Например, удалось увеличить тактовые частоты кластеров CCX процессоров Ryzen Threadripper 3960X от примерно 4.070 МГц до 4.225-4.300 МГц. Напряжения при этом снижаются (с 1,295 до 1,25 В), поэтому процессор и потребляет меньше.
Еще один результат было получен с Ryzen 9 3900XT, чья тактовая частота была увеличена с 4.042 МГц до примерно 4.500 МГц – при пониженном напряжении. При дальнейших оптимизациях от одиночного CCX удалось выжать более 4.600 МГц.
Впрочем, результаты нельзя перенести 1:1 на другие процессоры, пусть даже такой же модели. Каждый чип имеет свой уровень качества, поэтом у AMD сортирует лучшие CCD на те процессоры, которые смогут раскрыть их потенциал.
Но в оптимизацию свой вклад вносит не только процессор, но и материнская плата, система питания и охлаждения. Производители выбирают разные дизайны VRM с разными компонентами. Здесь с лучшей стороны хотелось бы отметить материнские платы ASUS и MSI, но Gigabyte несколько отстает. По работе функции Load Line Calibration материнские платы ASRock хуже всего подходят для CTR.
Используемый кулер сам по себе определяет направление разгона. Необходим хороший воздушный кулер или система водяного охлаждения. Если один и тот же процессор работает, например, на 60 или 85 °C, то можно прогнозировать разницу в 200 МГц. Так что при оценке результатов всегда стоит учитывать охлаждение.
Теперь очередь за вами. Уже можно скачать версию 1.1 Beta 3 утилиты ClockTuner for Ryzen. Будет интересно посмотреть, какие именно результаты вы получите со своими процессорами Ryzen. Пишите свои отзывы в комментариях.
Обновление: CTR 1.1 Beta 3
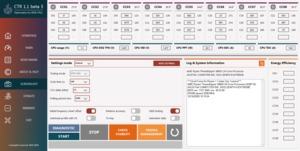
С версией CTR 1.1 Beta 3 с пользовательским интерфейсом произошли некоторые изменения. Также изменилось и управление профилями. Используя два профиля, можно вносить небольшие изменения между ними. Что облегчает ручную настройку, позволяя менять опции с небольшим шагом.
Более важны изменения в движке, отвечающем за оптимизацию настроек. Перед тем, как переходит на более высокую частоту, CTR проверяет текущую частоту со сниженным по сравнению с эталонным напряжением. Что должно предотвратить появление “синих экранов” и высоких уровней vdroop. Кроме того, если CCX уже работает на пределе стабильности, он не будет тестироваться на более высокой частоте.
Была улучшена и диагностика по отношению к нагрузке, так что проблем будет меньше и здесь. Была оптимизирована поддержка материнских плат ASRock и Gigabyte с уровнями Load Line Calibration (LLC). Впрочем, это верно и для других производителей. Была улучшена поддержка процессоров Ryzen 3 3100, Ryzen 5 3500 и Ryzen 5 3500X. Утилиту CTR можно использовать и без SMT.
Также обновился тест стабильности, который проходит 10 минут. В режиме “Enhanced” на тест отводится 20 минут, что гарантирует еще более надежный результат.

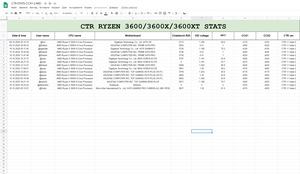
Можно сравнить ваши результаты с пользовательской базой в таблице Google для каждого процессора:
ClockTuner for Ryzen версии 1.1 Beta 3 можно скачать здесь.
Подписывайтесь на группы Hardwareluxx ВКонтакте и Facebook, а также на наш канал в Telegram (@hardwareluxxrussia).


Вся сложность состоит в том, что все BIOS различны. Но мы попытаемся с вами разобраться с таким BIOS как AMI. Вы не указали модели материнской платы, а это суть самое важное.
Итак, для того, чтобы в BIOS-АMI поставить загрузку с флешки на “Windows 10”, следует проделать следующие шаги: в обязательном порядке вставляем загрузочную флешку. Перезагружаем компьютер. Далее, жмём клавишу Delete. Лучше её держать до тех пор, пока не появится надпись “BIOS setup”. Приблизительно такая надпись должна у вас появиться.
Далее, переходим на вкладку “Advanced”, что можно перевести, как “расширенные настройки”. В свою очередь, там должен быть пункт под названием “Boot”. На этой вкладке, как только вы туда зайдёте, у вас будет список дисков, среди которых находится и флешка. На калькуляторном блоке клавиатуры есть длинная клавиша. Точнее их две. Одна Enter, вторая знак плюса. Он находится над Enter. С помощью клавиши плюс поднимаем флешку, абы она стала первой в списке загрузок.
После этого нажимаем клавишу F10. Выскакивает надпись примерно такого характера: “press any key if you want to save this parameters”. А перевести это можно приблизительно, как “если вы хотите сохранить данные настройки, то нажмите любую клавишу.”.
Нажимаем Enter, и ждём перезагрузки компьютера. Для верности, как будет загружаться машина, подержите немного пробел. Внимание! Если вы вынете флешку, то загрузку потом нужно будет ставить заново.
Closing Remarks
Just as we found two years ago when testing the Ryzen 7 1800X, disabling SMT can be of some benefit but your mileage will vary and depend strictly on the game (workload) and is just as likely to cause a regression in performance.
What disabling SMT doesn’t do is allow the Ryzen 9 3900X to beat the Core i9-9900K in games or even catch up to it. But then again we don’t really need something to justify the purchase, the 3900X and all other 3rd-gen Ryzen chips do what they do well and if you’re after a solid all-rounder the Ryzen 9 processor is it.
As we’ve seen already, the 3900X is plenty enough for high-end gaming and where it lacks a few frames it makes up for with significantly improved productivity performance and the ability to tackle more tasks simultaneously. It also runs much cooler, consumes a little less power, and works fine with the provided stock cooler.
We don’t recommend you disable SMT, unless you know that doing so will improve the performance in the specific game you’ll be playing. We’re not sure why turning SMT off hurts 1% low performance in so many games. At first we thought maybe it was because you go from a situation where the active threads required by the game can be utilized in a single core complex die with SMT enabled, to a situation where those threads are spread across both CCD’s with SMT disabled. However, that doesn’t seem to make sense given the 3900X generally offers better gaming performance than the 3700X, and we believe that’s because it has two CCD’s which increases the L3 cache capacity as well as the write lanes to the IO Die. We’ve reached out to AMD for their take on this, so if we hear anything interesting we’ll report back with a footnote here.
Что делать-то с низким FPS?
Переопределяем файл подкачки в системе
Сперва необходимо выставить файл подкачки в 8-16 Gb по верхнему пределу (в зависимости от того, какой объем ОЗУ установлен у тебя в ПК), нижний предел можно установить опираясь на рекомендацию системы.
Чем меньше объем ОЗУ — тем больше объём файла подкачки.

UPD: Если у тебя Тарков периодически крашится с ошибкой, то, вероятнее всего, тебе нужно выставить файл подкачки в «По выбору системы»;
Переопределяем масштабирование с высоким разрешением для EscapeFromTarkov.exe
Следом необходимо переопределить масштабирование с высоким разрешением, для того, чтобы исключить возможность избыточного перемасштабирования изображения в игре. Для этого в Windows 10 нужно перейти в папку, где установлена игра и открыть «Свойства» исполняемого файла EscapeFromTarkov.exe, кликнув по экзешнику ПКМ.

Нас интересует вкладка «Совместимость» и кнопка «Изменить параметры высокого DPI».

Кликаем по ней и в новом окне ставим галки в разделах «Разрешение программы» и «Переопределение масштабирования с высоким разрешением». В выпадающих списках выбираем «я открою эту программу» и «Приложение». Нажимаем «ОК» и закрываем все окна проводника .

Под Windows 7 делается практически аналогично и процесс не должен вызвать каких-либо сложностей.
Изменяем параметры видео-драйвера в «Панели управления NVIDIA»
Владельцы видео-адаптеров от AMD могут пропустить этот абзац.
Кликаем ПКМ по рабочему столу и залетаем в «Панель управления NVIDIA».

Слева в меню, в разделе «Параметры 3D» выбираем пункт «Управление параметрами 3D», в появившемся окне переходим во вкладку «Программные настройки» и в выпадающем списке выбираем EscapeFromTarkov.exe, а если его там нет, то кликаем по кнопке «Обзор» и находим нужный файл там и нажимаем кнопку «Добавить выбранную программу».


После этого снизу появится таблица с множеством параметров, нас будут интересовать следующие:
- Вертикальный синхроимпульс =>Выкл
- ГП рендеринга OpenGL =>Твоя основная видеокарта из списка
- Максимальное количество заранее подготовленных кадров =>1
- Потоковая оптимизация =>Вкл (нестабильный параметр для EFT)
- Режим управления электропитанием =>Предпочтителен режим макс. производительности
- Фильтрация текстур — трилинейная оптимизация =>Вкл
После отключения «Вертикального синхроимпульса» в панели NVIDIA, можно разлочить счётчик FPS в игре, включив в настройках графики «Вертикальную синхронизацию». При этом наблюдается повышенная нагрузка на GPU (видеокарту) с чрезмерным энергопотреблением и тепловыделением.


Включение экспериментальных функций в Expierence
Также для оптимизации Таркова можно включить экспериментальные функции в GeForce Expierence: «Шестерёнка» > «Общие» > «Включите экспериментальные функции».

Следом снова открываем «Панель управления управления Nvidia», переходим во вкладку «Программные настройки», выбираем процесс EscapeFromTarkov.exe и видим, что добавился новый пункт — «Режим низкой задержки»

выставляем его значение в «Ультра», сохраняемся и закрываем Панель управления Nvidia.
Установим и настроим программу Process Lasso
«Why join NAVY if you can be a pirate?» (с) Стив Джобс
Подробнее о программе Process Lasso ты можешь почитать на официальном сайте, там же ты можешь её приобрести и скачать, поддержав тем самым разработчиков софтины, но также ты можешь перейти на тёмную сторону силы и поступить как истинный засранец, скачав программу отсюда. Так или иначе выбор всегда за тобой!
После установки программы необходимо открыть Process Lasso, а следом запустить лаунчер Battlestate Games Launcher и запустить игру. Следом игру можно свернуть (Alt+Tab) и перейти к основному окну Process Lasso. Во вкладке «Все процессы» необходимо отыскать процесс EscapeFromTarkov.exe и кликнуть по нему ПКМ.

В выпадающем меню нас будут интересовать 5 первых пунктов:
- Класс приоритета => Всегда =>Высокий
- Соответствие ЦП (лимит загрузки ЦП) => Всегда =>Выделить все ЦП
- Приоритет ввода/вывода => Всегда =>Высокий
- Приоритет памяти => Всегда =>1 — очень низкий
- План питания приложения =>Максимальная производительность


UPD: На практике хватает только изменения плана питания приложения в «Максимальную производительность» и изменения приоритета процесса EscapeFromTarkov.exe в «Выше среднего» или «Высокий». Количеством ядер (Соответствием ЦП) управляет галочка в игре «Использовать только физические ядра CPU».
Первый пункт ставит процесс EscapeFromTarkov.exe в приоритете для обработки процессором перед иными процессами;
Второй — позволяет принудительно и равномерно распределить нагрузку, провоцируемую приложением на физические и логические ядра процессора;
Что касается Таркова, то игра лучше работает с отключенным в БИОСе гипертридингом (HyperTreading) и при количестве физических ядер не более 6-ти. Для AMD Ryzen желательно отключить Simultaneous Multithreading (SMT), аналог интеловского Hyper Treading.
UPD: Отключение Hyper Treading для Intel и SMT для AMD Ryzen — на сегодняшний день верный способ поднять себе FPS. Галочка в игре «Использовать только физические ядра CPU» перестаёт как-либо влиять на игру при отключенном Hyper Treading и SMT, при включенном же — просто ограничивает процессу игры «EscapeFromTarkov.exe» количество потоков вдвое, то есть если 12 потоков у процессора, она даст ему 6, если 16, то даст 8, если 8, то отдаст 4. Как известно поток — это «пол-ядра», то есть игра начинает использовать только четверть от реального количества «физических» ядер, проверить это можно с помощью Process Lasso. Поэтому куда эффективнее выключать HT и SMT через BIOS, в особенности владельцам с многоядерныx процессоров с количеством ядер более > 6 и напрочь забыть про эту злополучную галочку «Использовать только физические ядра CPU»
Третий пункт выставляет приложению высокий приоритет на операции ввода/вывода той или иной информации;
Четвертый — позволяет отметить EscapeFromTarkov.exe как приоритетный для обращения к ОЗУ (чем ниже цифра приоритета, тем он выше);
Пятый пункт позволяет ввести систему в режим максимальной производительности, что влечёт за собой поднятие тактовой частоты ЦП и ГП до максимальной отметки — в буст. В противном случае на 6-ти ядрах и 12-ти потоках к примеру, в игре процессор будет работать на стоковой частоте и не будет буститься, так как игра не создаёт должной нагрузки на процессор. C видеокартой аналогичная ситуация.
У меня видеокарта от американского производителя EVGA. У них есть утилита, аналогичная MSI Afterburner, но с одной интересной особенностью, в ней есть функция KBoost, которая вводит видеокарту в режим максимальной производительности вне зависимости от нагрузки. Включение данной функции позволяет исключить просадки напряжения и тактовой частоты на ядре графического процессора.

Утилита работает только с картами вендора EVGA!
EVGA Precision X1 для всех вендоров карт RTX, GTX16xx и GTX10xx
Утилита от EVGA, позволяющая бустить частоту и напряжение карты вне зависимости от нагрузки на GPU, подходит для всех видеокарт GeForce серий RTX, GTX16xx и GTX10xx от любых производителей.
Необходимо скачать и установить программу EVGA Precision X1 отсюда.
Далее в основном окне программы кликнуть по кнопке «Boost Lock» в правом нижнем углу окна программы.

После этого видеокарта зафиксирует максимальную частоту и напряжение на графическом ядре и памяти, что позволит снизить провалы FPS в Таркове.
P.S. Благодарность пользователю Тарасию за данную инфу в комменте.
Настроим графику в игре

Красивая графика это конечно здорово, но по моему скромному мнению, для динамичных онлайн-шутеров красивая графика с кучей эффектов и их отвлекающей составляющей — перебор. Поэтому я оставил в максимуме текстуры и тени (хотя тени можно поставить в Низкое, чтобы эффект был ещё ощутимее), а эффекты выключил совсем, включая общую видимость и видимость теней.
Для видеокарт с объемом памяти 6 Gb и ниже — настоятельно рекомендую ставить качество текстур «Высокие + стриминг текстур» или «Средние». В данном случае вы сможете значительно поднять себе FPS за счёт того, что текстуры не будут переполнять видеопамять и для их хранения не будет использоваться более медленная ОЗУ.
Общая видимость позволяет видеть вдали всякий хлам, разбросанный по карте. Отключение в минимум этого параметра на видимость противника вдалеке не влияет, а наоборот упрощает эту процедуру;
Видимость теней позволяет видеть тени вдали, прикручивание этого параметра в минимум даёт определенные визуальные преимущества при хорошей освещенности на карте;


О роли других параметров можно подробно вычитать в приложении GeForce Experience.


Пробуй и эксперементируй с различными комбинациями настроек и следи за поведением FPS.
В игре есть встроенный счётчик FPS. Чтобы активировать его, нажми тильду «
» на клавиатуре и напиши команду fps 1 или fps 2, затем нажми «Enter» и закрой консоль.
Small boosts, big power up?
Mentioned in this article
Overclocking aside, none of these tips provide major performance boosts individually. Add it all up, however, and you may see a significant performance increase in some games and applications, depending on your overall system setup.
While tinkering with your system’s SMT may be more hassle than it’s worth, most of the tips here are more of the “set it and forget it” variety. By clean-installing Windows, tweaking your CPU clock and memory speeds, enabling the Ryzen Balanced power plan, and maybe even disabling the Windows High Precision Event Timer, you can inject a significant amount of extra pep in your Ryzen PC’s step in the course of a single afternoon.
Just keep an eye out for those crucial BIOS updates. They’re still coming.
Senior editor Brad Chacos covers gaming and graphics for PCWorld, and runs the morning news desk for PCWorld, Macworld, Greenbot, and TechHive. He tweets too.

When we first began benchmarking Ryzen CPUs, we already had a suspicion that disabling simultaneous multithreading might give a performance boost in games, mirroring the effects of disabling hyperthreading (Intel’s specific twist on SMT) when it was first introduced. Although hyperthreading now has a generally positive effect in our benchmarks, there was a time when it wasn’t accounted for by developers—presumably partly related to what’s happening to AMD now.
In fact, turning SMT off offered relatively minor gaming performance increases outside of Total War: Warhammer—but any increase at all is notable when turning off a feature that’s designed to be positive. Throughout our testing, the most dramatic change in results we saw were from overclocking, specifically on the low stock frequency R7 1700 ($330). This led many readers to ask questions like “why didn’t you test with an overclock and SMT disabled at the same time?” and “how much is Intel paying you?” to which the answers are “time constraints” and “not enough, apparently,” since we’ve now performed those tests. Testing a CPU takes a lot of time. Now, with more time to work on Ryzen, we’ve finally begun revisiting some EFI, clock behavior, and SMT tests.
Testing Methodology
Before we discuss the results, it’s worth noting that turning SMT off isn’t a magical performance booster. SMT is a feature that AMD has been lacking for some time, and it’s great to see SMT finally introduced—it’s already showing its potential in synthetic benchmarks like Cinebench, and in real-world render testing. The great strength of Ryzen is in mixed workloads, and it’s completely impractical to reboot and enable SMT in BIOS to switch from gaming to production, so ideally widespread adoption of AMD’s SMT CPUs will encourage optimization or debugging where necessary. There may also be fixes that need to happen outside of software, like microcode and EFI updates. For now, though, disabling SMT is an easy way to boost FPS by a little and show more potential of the chip.
We chose our favorite of the R7 series, the 1700, for this test. The R7 1700 ($330) we were sent managed a semi-stable overclock of 4.0GHz by doing nothing more than increasing the frequency in BIOS, which had the pleasant side-effect of enabling us to run our memory at a previously unattainable 2933MHz. All tests were performed on the ASUS Crosshair with the same BIOS used in previous benchmarks (5704). We will update this EFI once we’re back from the latest show, but the changes should largely be relegated to DOCP. Because of the rapid pace of things, updating the bench for every single article is unsustainable. We will therefore launch content in blocks of same-config tests, update, and iterate. This is more time/money accessible for our outlet than an update for every single test (as updates are nonstop). Because we only care about deltas here, and because changes thus far have been minimal, we’re in good shape to test.
This is still an imperfect test, but we’re doing what people asked: The exact same set of tests as previously, except with overclocking and SMT0 applied to the CPU simultaneously. As for the imperfection, it’s memory speed — we’re increasing memory speed with the CPU OC (part of the initial review), and will be doing so again with the SMT0 variant. Ideally, we do these all with a fixed memory speed — but as this was not part of the initial test plans, and as we’ve been dealing with nonstop requests to perform this specific test, we’re adding in the user request today. This is for readers/viewers. We are also putting the 1700 in the best possible light for gaming with SMT0, an OC on the core, and 2933MHz memory (our max stable during the time of these tests).
We retested each game on our bench with the same 4.0GHz overclock and SMT disabled, as well as Cinebench (render and synthetic benchmarks generally perform better with SMT and aren’t the focus of this test). The most useful comparisons are in WD2, BF1, and TWW, since we also individually tested both SMT disabling and overclocking.
Our R7 1700 review contains the rest of the methodology, components used during testing, and benchmark information.
Battlefield 1 – AMD Ryzen SMT Off & Overclocked Benchmarks

Battlefield 1 had a minor increase from 135 (OC) to 135.7 average FPS, but in this case, we have results for SMT0 with no overclock to compare against. With the stock R7 1700 at 129 FPS as a base, disabling SMT increased the average by 2.6%, overclocking by 4.7%, and doing both by 5.2%. At this point, comparing with percentages is just silly: the fact is that disabling SMT on the overclocked 1700 gained us less than 1 FPS (
0.7FPS, to be precise), which is within the margin of error for a benchmark that we perform manually. This is especially true when considering BF1’s unique behavior in data streaming, as we’ve explained in previous articles.
That said, the improvement in frametimes is noteworthy. As we’ve stated several times in these Ryzen product reviews or studies, the difference demonstrated between OC SMT1 and OC SMT0 is not visible insofar as user experience, but is certainly measurable and repeatable. Disabling SMT continues to prove beneficial for frametimes in this title.
Watch Dogs 2 – AMD Ryzen SMT Off & Overclocked Benchmarks

The really interesting results came from Watch_Dogs 2 and, as usual, Total War: Warhammer. Watch_Dogs 2, one of our go-tos for CPU-heavy gaming (see here), allowed the 1700 SMT0+OC to attain a (relatively) competitive 91.3 FPS average, placing it above AMD’s own 1800X and below Intel’s aging (stock) i7-4790K. This performance is mostly impressive when compared to the 1700’s own results: Watch_Dogs 2 didn’t initially perform any better with SMT disabled, but when overclocked, disabling SMT performed 6.2% better (jointly 14.2% better than stock).
Total Warhammer – AMD Ryzen SMT Off & Overclocked Benchmarks
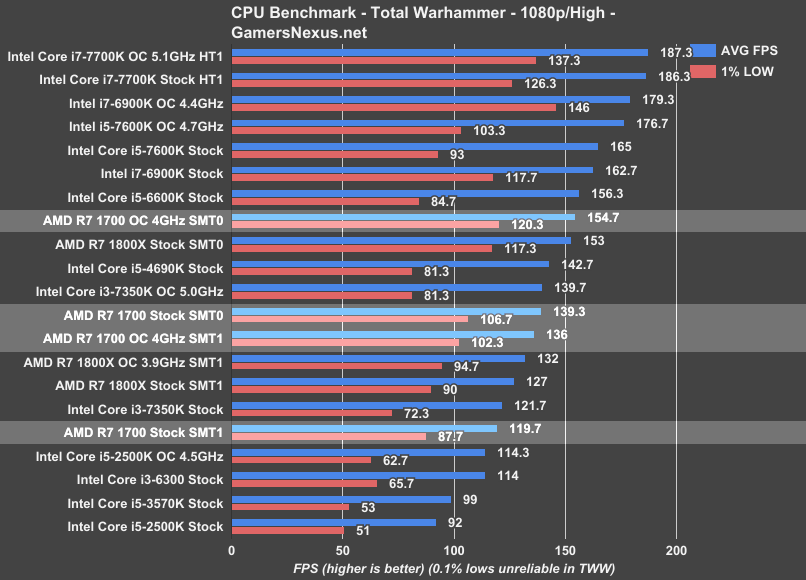
Total Warhammer is one of the games specifically cited by AMD as being in the process of optimization, and we’re eagerly awaiting any patches given these results: an 11% increase over SMT0, 13.8% over a plain overclock, and a massive 29.2% increase in average FPS over the out-of-the-box stock 1700 (with 2666MHz memory). 154.7 FPS places the 1700 just below the last-gen i5-6600K in our tests, but if these fluctuations are any indication, there’s plenty of room for easy optimization by Creative Assembly. We’ll be keeping a close eye on Total Warhammer in the near future as an indication of just how much software changes can really affect AMD hardware’s performance.
AOTS DX12 – AMD Ryzen SMT Off & Overclocked Benchmarks
We’re now entering into territory where we don’t have SMT0+Stock tests, but can still compare against OC+SMT tests. Time is limited, here, and we don’t have the huge team required to run infinite tests.

The least impressive result on our bench was in AOTS DX12, which showed a miniscule (within the range of error) decrease in performance over a plain overclock. Ideally, we’d see a significant performance decrease by disabling SMT, but “no effect” is a good start. Note that this particular workload is intensive on the CPUs, so we’ll need to defer to titles which achieve higher framerates to better see greater fluctuation.
MLL & GTA – AMD Ryzen SMT Off & Overclocked Benchmarks


MLL and GTA both showed minor performance increases of 1-2FPS—nothing for a real user to consider disabling SMT over. Dumping SMT continues to improve our frametimes, as shown in previous tests.
Cinebench

Only one synthetic test was performed, as this is primarily an issue with gaming performance. Cinebench isn’t a “real” workload, but it is an AMD favorite and somewhat a simulation of rendering, taking full advantage of the new 8C/16T R7s. As such, multithreaded scores are the relevant numbers here. As we covered previously, our 1700 at 4.0GHz with SMT enabled scored a 1764, significantly higher than Intel’s stock i7-6900K (which is 3x the price, by the way), responsible for scoring 1470.5. Mileage may vary, as the 4.0GHz overclock wasn’t stable in longer render tests, and the 6900K did score 1823 when it was similarly overclocked. With SMT disabled, however, the 1700 scored 1252.5—still impressive, but as expected, much lower than when allowed to render on all possible threads.
Closing Thoughts
Overall, the effects of disabling SMT are limited in comparison to a basic overclock of the R7 1700. On the 1800X, a chip that ships near its potential frequency, we saw unimpressive results both from overclocking and disabling SMT, except in TWW. Discrepancies apply when considering frametime performance, where disabling SMT improves frametimes in ways that are generally invisible to the user, but fully measurable and repeatable. On the 1700, the ideal platform for this test, disabling SMT in addition to an overclock didn’t improve average FPS performance by a meaningful amount outside of Watch_Dogs 2 and Total Warhammer, and even there, TWW is the biggest item of discussion. That’s got all manner of issues on Ryzen right now, though. Again, disabling SMT is not a practical or logical thing for a user to do—it has a place in benchmarks, both to edge results closer to what they “should” be in an ideal world, and to demonstrate that something is wrong somewhere. We recommend R7 1700 CPUs as a good price/performance option in machines that will be used both for gaming and for production, and disabling SMT gains a few FPS in games at a massive production performance cost. Doesn’t make a whole lot of sense to disable SMT, then, unless you’re willing to reboot every time the workload changes.
Retesting AMD Ryzen Threadripper’s Game Mode: Halving Cores for More Performance
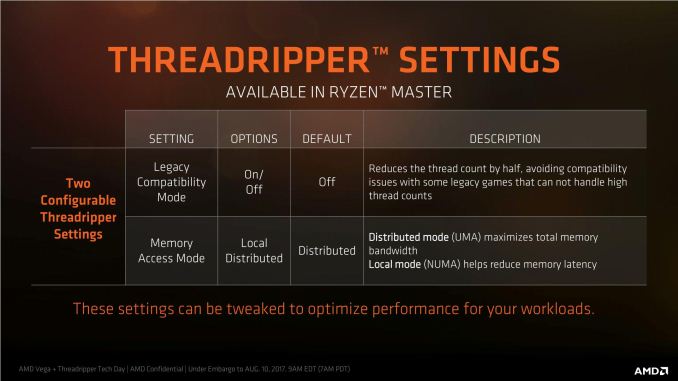
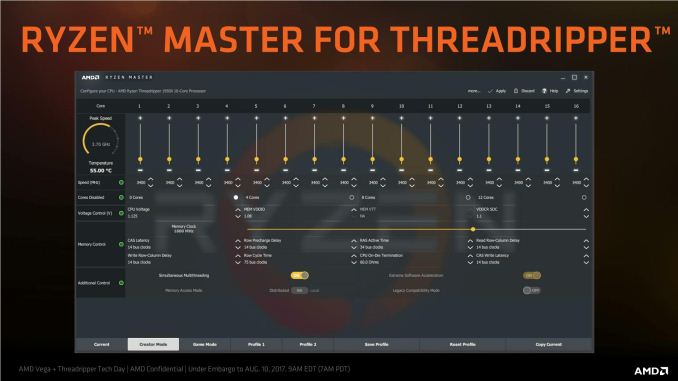
For the launch of AMD’s Ryzen Threadripper processors, one of the features being advertised was Game Mode. This was a special profile under the updated Ryzen Master software that was designed to give the Threadripper CPU more performance in gaming, at the expense of peak performance in hard CPU tasks. AMD’s goal, as described to us, was to enable the user to have a choice: a CPU that can be fit for both CPU tasks and for gaming at the flick of a switch (and a reboot) by disabling half of the chip.
Initially, we interpreted this via one of AMD’s slides as half of the threads (simultaneous multi-threading off), as per the exact wording. However, in other places AMD had stated that it actually disables half the cores: AMD returned to us and said it was actually disabling one of the two active dies in the Threadripper processor. We swallowed our pride and set about retesting the effect of Game Mode.
A Rose By Any Other Name
It’s not very often we have to retract some of our content at AnandTech – research is paramount. However in this instance a couple of things led to confusion. First was assumption related: in the original piece, we had assumed that AMD was making Game mode available through both the BIOS and through the Ryzen Master software. Second was communication: AMD had described Game Mode (and specifically, the Legacy Compatibility Mode switch it uses) at the pre-briefing at SIGGRAPH as having half the threads, but offered in diagrams that it was half the cores.
Based on the wording, we had interpreted that this was the equivalent of SMT being disabled, and adjusted the BIOS as such. After our review went live, AMD published and also reached out to us to inform of the error: where we had tested the part of Game Mode that deals with legacy core counts, we had disabled SMT rather than disabling a die and made the 16C/32T into to a 16C/16T system rather than an 8C/16T system. We were informed that the settings that deal with this feature are more complex than simply SMT being disabled, and as such was being offered primarily through Ryzen Master.
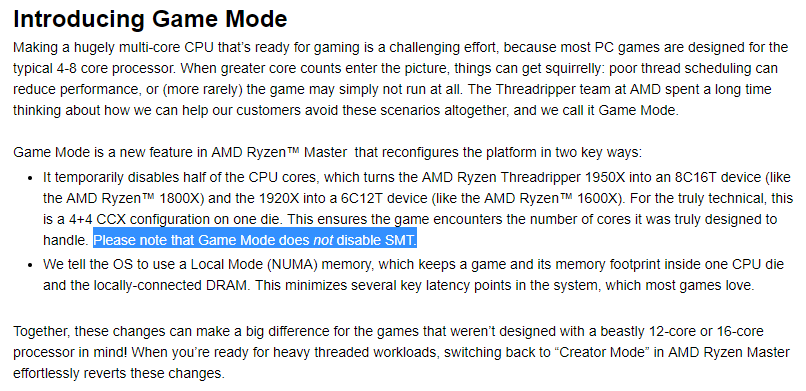
From AMD’s Gaming Blog. Emphasis ours.
So for this review, we’re going to set the record straight, and test Threadripper in its Game Mode 8C/16T version. The previous review will be updated appropriately.
So What Is Game Mode?
For Ryzen Threadripper, AMD has defined two modes of operation depending on the use case. The first is Creator Mode, which is enabled by default. This enables full cores, full threads, and gives the maximum available bandwidth across the two active Threadripper silicon dies in the package, at the expense of some potential peak latency. In our original review, we measured the performance of Creator Mode in our benchmarks as the default setting, but also looked into the memory latency.
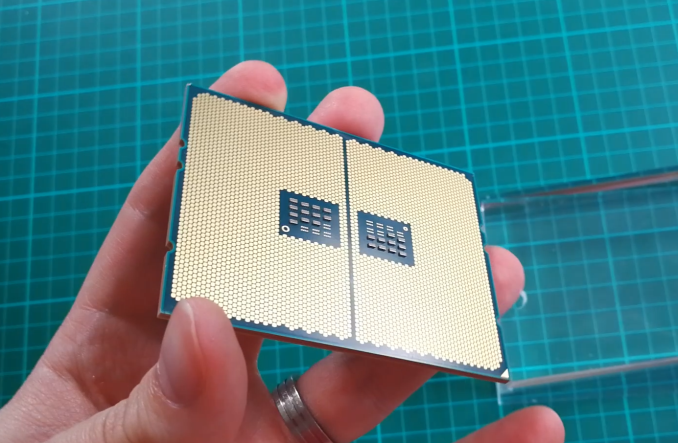
Each die can communicate to all four memory channels, but is only directly connected to two memory channels. Depending on where the data in DRAM is located, a core may have to search in near memory (the two channels closest) or far memory (the two channels over). This is commonly referred to a non-uniform memory architecture (NUMA). In a unified memory system (UMA), such as Creator mode, the system sees no difference between near memory and far memory, citing a single latency value for both which is typically the average between the near latency and the far latency. At DDR4-2400, we recorded this as 108 nanoseconds.
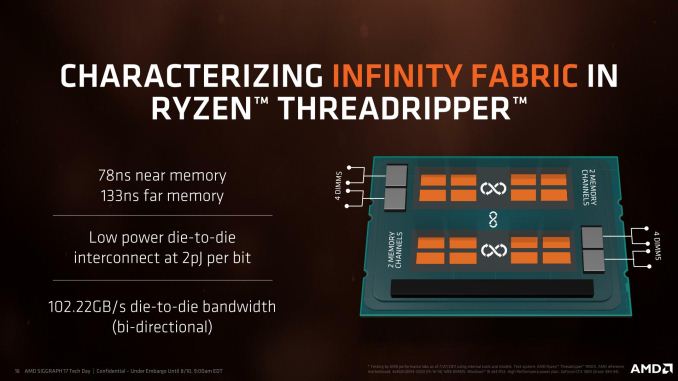
Game Mode does two things over Creator Mode. First, it changes the memory from UMA to NUMA, so the system can determine between near and far memory. At DDR4-2400, that 108ns ‘average’ latency becomes 79ns for near memory and 136ns for far memory (as per our testing). The system will ensure to use up all available near memory first, before moving to the higher latency far memory.
Second, Game Mode disables the cores in one of the silicon dies. This isn’t a full shutdown of the 8-core Zeppelin die, just the cores. The PCIe lanes, the DRAM channels and the various IO are still active, but the cores themselves are power gated such that the system does not use them or migrate threads to them. In essence, the 16C/32T processor becomes 8C/16T, but with quad-channel memory and 60 PCIe lanes still: the 1950X becomes an uber 1800X, and the 1920X becomes an uber 1600X. The act of disabling dies is called ‘Legacy Compatibility Mode’, which ensures that all active cores have access to near memory at the expensive of immediate bandwidth but enables games that cannot handle more than 20 cores (some legacy titles) to run smoothly.
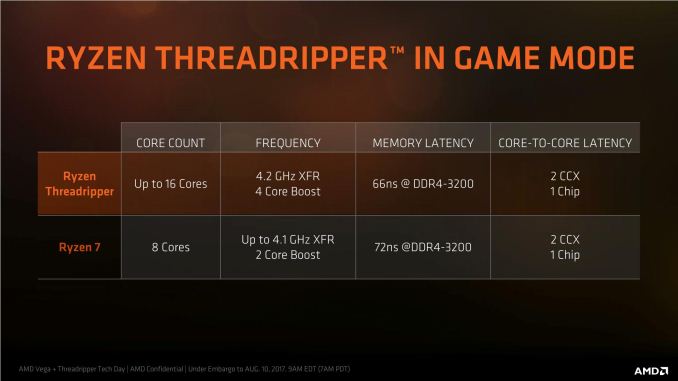
The core count on the left is the absolute core count, not the core count in Game Mode. Which is confusing.
Some users might see paying $999 for a processor then disabling almost half of it as a major frustration (insert something about Intel integrated graphics). AMD’s argument is that the CPU is still good for gaming, and can offer a better gaming experience when given the choice. However if we consider the mantra surrounding these big processors around gaming adaptability: the ability to stream, transcode and game at the same time. It’s expected that in this mega-tasking (Intel’s term) scenario, having a beefy CPU helps even though there will be some game losses. Moving down to only 8 cores is likely to make this worse, and the only situation Game Mode assists is for a user who purely wants a gaming machine but quad-channel memory and all the PCIe lanes. There’s also a frequency argument – in a dual die configuration, active threads can be positioned at thermally beneficial points of the design to ensure the maximum frequency. Again, AMD reiterates that it offers choice, and users who want to stick with all or half the cores are free to do so, as this change in settings would have been available in BIOS even if AMD did not give a quick button to it.
As always, the proof is in the pudding. If there’s a significant advantage to gaming, then Game Mode will be a plus point in AMD’s cap.
With regards how the memory and memory latency operates, Game Mode still incorporates NUMA, ensuring near memory is used first. The memory latency results are still the same as we tested before:
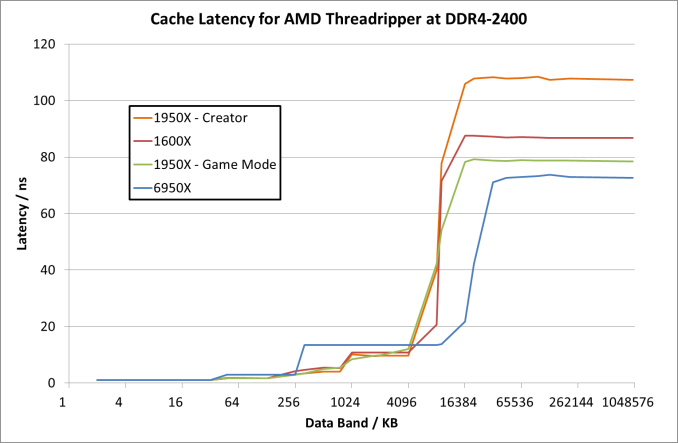
For the 1950X in the two modes, the results are essentially equal until we hit 8MB, which is the L3 cache limit per CCX. After this, the core bounces out to main memory, where the Game mode sits around 79ns when it probes near memory while the Creator mode is at 108 ns average. By comparison the Ryzen 5 1600X seems to have a lower latency at 8MB (20ns vs 41 ns), and then sits between the Creator and Game modes at 87 ns. It would appear that the bigger downside of Creator mode in this way is the fact that main memory accesses are much slower than normal Ryzen or in Game mode.
If we crank up the DRAM frequency to DDR4-3200 for the Threadripper 1950X, the numbers change a fair bit:
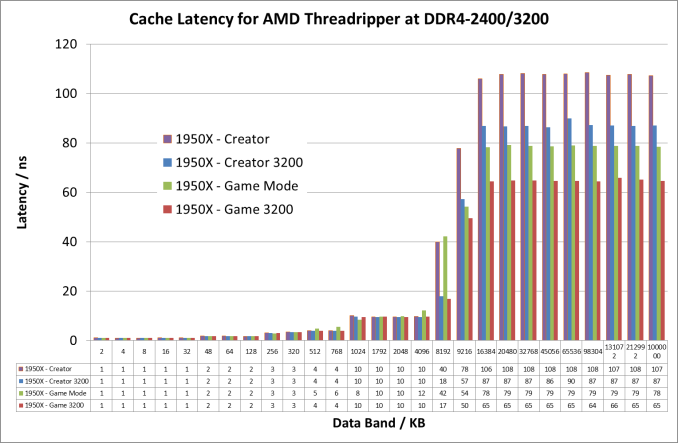
Click for larger image
Up until the 8MB boundary where L3 hits main memory, everything is pretty much equal. At 8MB however, the latency at DDR4-2400 is 41ns compared to 18ns at DDR4-3200. Then out into full main memory sees a pattern: Creator mode at DDR4-3200 is close to Game Mode at DDR4-2400 (87ns vs 79ns), but taking Game mode to DDR4-3200 drops the latency down to 65ns.
Testing, Testing, One Two One Two
In our last review, we put the CPU in NUMA mode and disabled SMT. Both of the active dies were still active, although each thread had full CPU resources, and each set of CPUs would communicate to the nearest memory, however there would be potential die-to-die communication and more potential for far-memory access.
In this new testing, we use Ryzen Master to Game Mode, which enables NUMA and disables one of the silicon dies giving 8 cores and 16 threads.