How to Enable Remaining Battery Time in Windows 10
How to Enable Remaining Battery Time in Windows 10
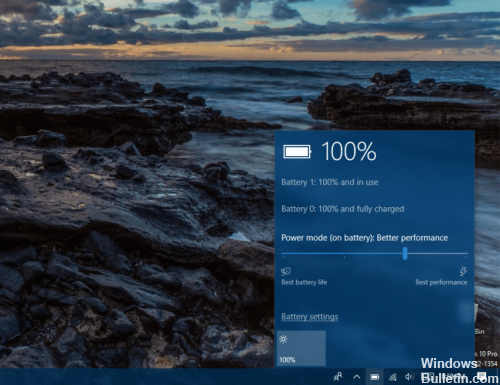
Windows 10 no longer displays the estimated battery life after the Creators update. You will only see a percentage when you hover your mouse over the battery icon – not even. Although it has its own particularities, you may still want to see it.
Although the time interval is not accurate and may vary depending on the use of Windows 10, it is more useful to have an estimate of the remaining battery life than a percentage estimate. Microsoft allows users to know how many hours remain on one of their devices, the Surface Headphones. However, it is somewhat ridiculous that Microsoft has decided to remove the same functionality as all other Surface products, including Surface Pro 6 and Surface Laptop 2.
Modify BIOS settings
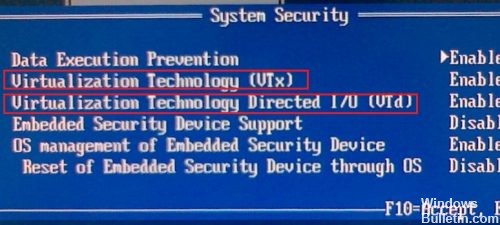
Activation of the remaining battery life can be performed and lasts less than one minute:
- Restart the PC
- Quickly press the ESC key before the HP logo appears.
- Select F10 BIOS Configuration from the menu.
- Use the right arrow key to access the system configuration.
- Select the remaining battery life and press Enter.
- Select On
- Press F10 to save and exit the BIOS.
Why Did Microsoft Hide the Battery Life Estimate?
This information was removed because it’s just an estimate. It can change dramatically depending on what processes are running, how bright your screen is, and whether you’re connected to Wi-Fi or Bluetooth. Your computer is making an informed guess and displaying an estimated battery life in real-time. It can fluctuate wildly, and Microsoft seems to think it’s no longer useful.
Apple recently made the same decision on macOS, too. By default, both macOS and Windows just show the percent of your laptop’s battery you have left with no guess about how long it will last.

58 Comments
View All Comments
Zodiark1593 – Monday, October 15, 2012 – link
Think we can get a comparison of the GTX 680M SLI vs the Radeon 7970M Crossfire?
Also, do Clevo laptops that come equipped with dual GPUs also rely on a muxless design? Reply
sabot00 – Monday, October 15, 2012 – link
“That’s a cost increase of 15% for a typical gaming performance increase of around 20% at high quality settings”
I disagree with this reasoning, as a laptop also does many other things, many of which (CPU, HDD, RAM, internet performance) don’t increase with the price.
This is analogous to saying that one can purchase a 256GB 830 SSD for $160, which is only around a $40 premium over a 1TB laptop HDD. Then claiming that this new laptop has 600% more performance in random 4K reads for only a $40 (2% increase for a $2000 laptop) premium.
While important to many people, especially buyers of these laptops, it’s ultimately up to the buyer to decide, and as such, the premium for a purely graphical upgrade should not be weighed against the total cost of the laptop.
$450, in terms of OEM price, the GTX 680M is $650, truly, it is a 44% percent increase in price of the graphics subsystem for a 20% increase in graphics performance. Reply
JarredWalton – Monday, October 15, 2012 – link
krumme – Tuesday, October 16, 2012 – link
Going by your logic, every gamer should buy a faster gfx for their rig. As total cost always will make the faster gfx a better choice. When does it end?
You can explain all you want, but your reasoning stands as one of they most idiotic this year, and makes this look like a commercial.
Man even Nvidia nor AMD would ever come up with such an argument.
Think about applying this logic to rest of your purchases. Damn. Reply
cjb110 – Tuesday, October 16, 2012 – link
I think if your looking at laptop gaming then yes the logic of buying the fastest gfx is sound. Laptops still have more of a mismatch between the capability of the cpu and the gpu. i.e. the CPU isn’t the bottleneck.
I don’t think any one at AnandTech would apply the same logic to desktop gaming. In desktops its more even, so making sure the two are matched will save you money. Reply
krumme – Tuesday, October 16, 2012 – link
No ssd, 768 15 pathetic screen, lousy build quality?
274 usd brings you a long way of improving your rig.
Its the first time i hear the argument in 20 years on the www, and for a good reason. Reply
JarredWalton – Tuesday, October 16, 2012 – link
No, it’s not the first time the argument has been made. We frequently discuss the value of upgrading to a faster GPU in our desktop GPU reviews. If you look at an HD 7770 GPU that costs $125 and compare that to a 7870 at $240, is there value in the upgrade? Yes: it’s substantially faster (nearly twice as fast), which opens up the possibility for 1080p gaming in most titles. Then we look at the HD 7970 and it’s $410 but is only 20-30% faster. It’s no longer a stellar upgrade.
Here, we’re looking at the total cost with gaming as the main purpose for buying a gaming laptop. It’s okay to think people buying gaming laptops have more dollars than sense, but assuming someone wants a high performance gaming laptop, they’re going to be shelling out minimum $1800 for something with HD 7970M or GTX 680M. So, if you have to pay $200 more to swap out AMD for NVIDIA hardware, is there value there?
The answer is a resounding yes. Sure, the 20% performance increase is nice, but it’s about more than the performance. I specifically note the driver situation (twice in the conclusion alone). Given the option between Enduro and Optimus, right now you’re shooting your gaming laptop in the foot if you go with Enduro. AMD has to fix this, and I think they will fix things, but that doesn’t change the fact that they’ve been selling 7970M for four or five months with a major lack of driver support. Talk to me in another month, and hopefully I can say that it’s no longer a major sticking point, but today? Nope, AMD’s solution is hamstrung. Reply
krumme – Wednesday, October 17, 2012 – link
The argument about driver and the quality of optimus is completely valid in my world. I have good experience with the optimus gaming laptop i have, and would always favor stability. Enduro is not working yet. Its very simple for my personal preference.
But when buying a rig, you are always torn between where to put your money.
Do you prefer a gaming rig with an ssd and better screen to a faster gfx? – its not up to the reviewer to be the judge here. And present it as the truth. The reviewer can present the facts, and then the consumer, can make the right choises based on his own needs. The reviewer should be the guide. Reply
JarredWalton – Wednesday, October 17, 2012 – link
You’re reading a review, which inherently has subjective opinion — a full page of it earlier, obviously, but the conclusion has a lot of subjective stuff as well. It actually *is* a reviewers job to be a judge; otherwise I should just run the benchmarks and post graphs and I could be done with a review in a day or two rather than spending a couple weeks running and evaluating. It’s not a laptop review if all you’re doing is showing performance and the price. You need to evaluate how the whole package comes together.
People can certainly disagree with me and say, “I don’t personally need or want to spend the money for an SSD.” Or, “I think the 7970M is the better graphics card [because. ]” That’s fine. But my opinion is that when looking at the cost to buy a well equipped P170EM for gaming purposes, the additional money required to go from 7970M to 680M is definitely the way to go. If the extra $275 at AVADirect for that particular upgrade is “too much”, you should NOT be buying a gaming notebook that costs $1500+ in the first place. Reply
krumme – Wednesday, October 17, 2012 – link
The recommendation of the more expensive alternative is wrapped in numbers, presenting it as objective fact.
When what happens is comparing total cost to a single benefit, albeit the most important one. Its inconsistent, and presented the wrong way imho. Its very simple just to say its say 15-20% faster, then the buyers can make up for themselves. Reply
Proper laptop battery usage guide
Memory Effect
First of all it’s necessary to unfold a myth that persists in many peoples head.
The battery memory effect.
In lithium-based batteries this is in fact a myth, it only applies to older Nickle-based batteries. So fully discharging and charging the battery is completely useless and even harmful as we will see below.
The modern lithium battery can be charged regardless of its current percentage, given that it has absolutely no negative effect in its performance.
Should I remove the battery when A/C is plugged in?
Many laptop users have this question and we will answer it right now:
The answer is: YES and NO, it depends on the situation.
Having a battery fully charged and the laptop plugged in is not harmful, because as soon as the charge level reaches 100% the battery stops receiving charging energy and this energy is bypassed directly to the power supply system of the laptop.
However there’s a disadvantage in keeping the battery in its socket when the laptop is plugged in, but only if it’s currently suffering from excessive heating caused by the laptop hardware.
– In a normal usage, if the laptop doesn’t get too hot (CPU and Hard Disk around 40єC to 50єC) the battery should remain in the laptop socket;
– In an intensive usage which leads to a large amount of heat produced (i.e. Games, temperatures above 60єC) the battery should be removed from the socket in order to prevent unwanted heating.
The heat, among the fact that it has 100% of charge, is the great enemy of the lithium battery and not the plug, as many might think so.
Battery discharges
 Full battery discharges (until laptop power shutdown, 0%) should be avoided, because this stresses the battery a lot and can even damage it. It’s recommended to perform partial discharges to capacity levels of 20
30% and frequent charges, instead of performing a full discharging followed by a full charging.
Laptop batteries contain a capacity gauge that allows us to know the exact amount of energy stored. However, due to the charging/discharging cycles, this sensor tends to be inaccurate overtime.
Some laptops include in their BIOS, tools to recalibrate this battery gauge, which is nothing more than a full discharge followed by a full charge.
So to calibrate the gauge, it should be performed, in every 30 discharge cycles, a full discharge non-stop , followed by a also, non-stop, full charge.
An inaccurate gauge can lead to the fact that the the battery capacity values are are wrong. The battery may report that it still has 10% of capacity when in fact it has a much lower value, and this causes the computer to shutdown unexpectedly.
 Discharge (or charge) cycles consist of using all that battery charge (100%) but not necessarily all at once.
For example, you can use the laptop for some minutes in a day, using half its capacity e then fully charge it. If you did the same thing in the next day, it would be counted a discharge cycle and not two, so it may take several days until a full discharge cycle is completed.
How to perform a calibration (full discharge)?
The most adequate method to do a full discharge (100% to a minimum of 3%) consists of the following procedure:
- Fully charge the battery to its maximum capacity (100%);
- Let the battery “rest” fully charged for 2 hours or more in order to cool down from the charging process. You may use the computer normally within this period;
- Unplug the power cord and set the computer to hibernate automatically at 5% as described by the image sequence below (click images to enlarge). If you cannot select 5%, then you should use the minimum value allowed, but never below 5%;


After the calibration process, the reported wear level is usually higher than before. This is natural, since it now reports the true current capacity that the battery has to hold charge. Lithium Ion batteries have a limit amount of discharge cycles (generally 200 to 300 cycles) and they will retain less capacity over time.
Many people tend to think “If calibrating gives higher wear level, then it’s a bad thing”. This is wrong, because like said, the calibration is meant to have your battery report the true capacity it can hold, and it’s meant to avoid surprises like, for example, being in the middle of a presentation and suddenly the computer shuts down at 30% of charge.
Prolonged storage
To store a battery for long periods of time, its charge capacity should be around 40% and it should be stored in a place as fresh and dry as possible. A fridge can be used (0єC – 10єC), but only if the battery stays isolated from any humidity.
One must say again that the battery’s worst enemy is the heat, so leaving the laptop in the car in a hot summer day is half way to kill the battery.
Purchasing a replacement battery
If you intend to purchase another battery, it’s recommended that you do it only when the current battery is very degraded. If it’s not the case, the non usage of a battery leads to its degradation.
If a spare battery is purchased and won’t be used for a long time, the above storage method should be used.
Besides that, when purchasing a battery you must pay attention to the manufacturing date.
Advantages in using BatteryCare
BatteryCare allows you to have the control over the discharge cycles number, and when this reaches 30 (or other configured value), it notifies you that it’s time to perform a full discharge in order to keep the battery gauge calibrated.
Like this, it’s guaranteed to always have the correct capacity values reported by the battery.
Besides, when using the battery, there’s the possibility to suspend some Operating System features that help degrading the autonomy (only in Windows Vista or higher):
– Windows Aero, the theme that allows for visual effects like window transparency, requires graphics card acceleration, which obviously will help decreasing the battery lifetime;
– SuperFetch, ReadyBoost and SearchIndexer are three Windows Vista (and higher) services that, even in battery mode, are using the hard disk a lot and increase total power consumption, thus decreasing battery lifetime. Suspending these services has absolutely no negative impact on the performance or security of the system.
These features are resumed once the laptop is plugged in to A/C power.
Adjust Graphics and Display Settings
You’ll want to make sure that apps aren’t using the discrete GPU (if your laptop has one) when they don’t need to.
If you have a powerful graphics processor in your laptop (in essence, anything whose name starts with “Nvidia GeForce GTX” or, much less commonly, “AMD Radeon RX”), you can ensure that only games or other graphics-intensive apps need to use it, while everything else can get by using the more efficient on-CPU silicon for graphics processing. Assuming your system makes use of Nvidia GeForce graphics, open the GeForce control panel (typically found in the Windows notification area on the right side of the taskbar), then click on the Program Settings tab to assign each app to a specific graphics-processing chip. Allocate the GeForce discrete chip to games and photo- and video-editing apps like Adobe Photoshop and Premiere, while assigning everything else to the integrated chip.
To perform a similar assignment on a MacBook, search for Energy Saver and make sure the “Automatic graphics switching” option is checked. You don’t have the same kind of fine-tuned control over each program like you do in the GeForce panel, so you’ll have to trust macOS’s judgment when it comes to which app should use which graphics accelerator.
Настраиваем RAM в BIOS
Изменять можно основные характеристики оперативной памяти, то есть тактовую частоту, тайминги и напряжение. Все эти показатели взаимосвязаны. И поэтому к настройке оперативной памяти в БИОС нужно подходить теоретически подготовленным.
Способ 1: Award BIOS
Если на вашей системной плате установлена прошивка от Phoenix/Award, то алгоритм действий будет выглядеть примерно так, как указано ниже. Помните, что названия параметров могут незначительно отличаться.
- Делаем перезагрузку ПК. Входим в БИОС с помощью сервисной клавиши или сочетания клавиш. Они бывают различные в зависимости от модели и версии «железа»: Del, Esc, F2 и так далее.
- Нажимаем комбинацию Ctrl + F1 для входа в расширенные настройки. На открывшейся странице стрелками переходим в пункт «MB Intelligent Tweaker (M.I.T.)» и нажимаем Enter.

Можно осторожно увеличить напряжение тока, подаваемого на RAM, но не более чем на 0,15 вольта.

Возвращаемся на главную страницу БИОС и выбираем параметр «Advanced Chipset Features».

Настройки закончены. Выходим из BIOS с сохранением изменений и запускаем любой специальный тест для проверки стабильности работы системы и RAM, например, в AIDA64.

- При неудовлетворенности результатами настройки RAM повторите по вышеуказанному алгоритму.
Способ 2: AMI BIOS
Если БИОС на вашем компьютере от American Megatrends, то кардинально значительных отличий от Award не будет. Но на всякий случай вкратце рассмотрим этот случай.
- Входим в BIOS, в главном меню нам нужен пункт «Advanced BIOS Features».

Покидаем BIOS и запускаем бенчмарк для проверки правильности наших действий. Делаем цикл несколько раз до достижения наилучшего результата.
Способ 3: UEFI BIOS
На большинстве современных материнских плат стоит UEFI BIOS с красивым и удобным интерфейсом, поддержкой русского языка и компьютерной мыши. Возможности по настройке RAM в такой прошивке очень широкие. Рассмотрим их подробно.
- Заходим в БИОС, нажав Delили F2. Реже встречаются другие сервисные клавиши, узнать их можно в документации или из подсказки внизу экрана. Далее переходим в «Advanced Mode», нажав F7.

На странице расширенных настроек переходим на вкладку «Ai Tweaker», находим параметр «Memory Frequency» и в выпадающем окне выбираем желаемую тактовую частоту оперативной памяти.

Продвигаясь ниже по меню, видим строку «DRAM Timing Control» и нажав на нее, попадаем в раздел регулировки различных таймингов RAM. ПО умолчанию во всех полях стоит «Auto», но при желании можно попробовать поставить свои значения времени отклика.

Возвращаемся в меню «Ai Tweaker» и заходим в «DRAM Driving Control». Здесь можно попытаться чуть увеличить множители частоты RAM и ускорить её работу. Но делать это надо осознанно и осторожно.

Опять возвращаемся на прошлую вкладку и далее наблюдаем параметр «DRAM Voltage», где можно изменять подаваемое на модули оперативной памяти напряжение электрического тока. Повышать вольтаж можно на минимальные значения и поэтапно.

Затем выходим в окно расширенных настроек и передвигаемся во вкладку «Advanced». Там посещаем «North Bridge», страницу северного моста материнской платы.

Здесь нас интересует строка «Memory Configuration», на которую и нажимаем.

В следующем окне можно изменить параметры конфигурации модулей оперативной памяти, установленных в ПК. Например, включить или выключить контроль и коррекцию ошибок (ECC) RAM, определить режим чередования банков оперативной памяти и так далее.

Закончив настройки, сохраняем внесенные изменения, покидаем BIOS и загрузив систему, проверяем работу RAM в любом специализированном тесте. Делаем выводы, исправляем ошибки повторной регулировкой параметров.
Latest firmware
Before we begin, it is imperative that you are on the latest firmware/BIOS from HP.
The Spectre x360 ships with BIOS version F04, but there have been a few updates since through the HP Support Assistant app. As such, you’ll need at least BIOS version F10a or F11 to turn on remaining battery time as the option was not part of the earlier firmware.
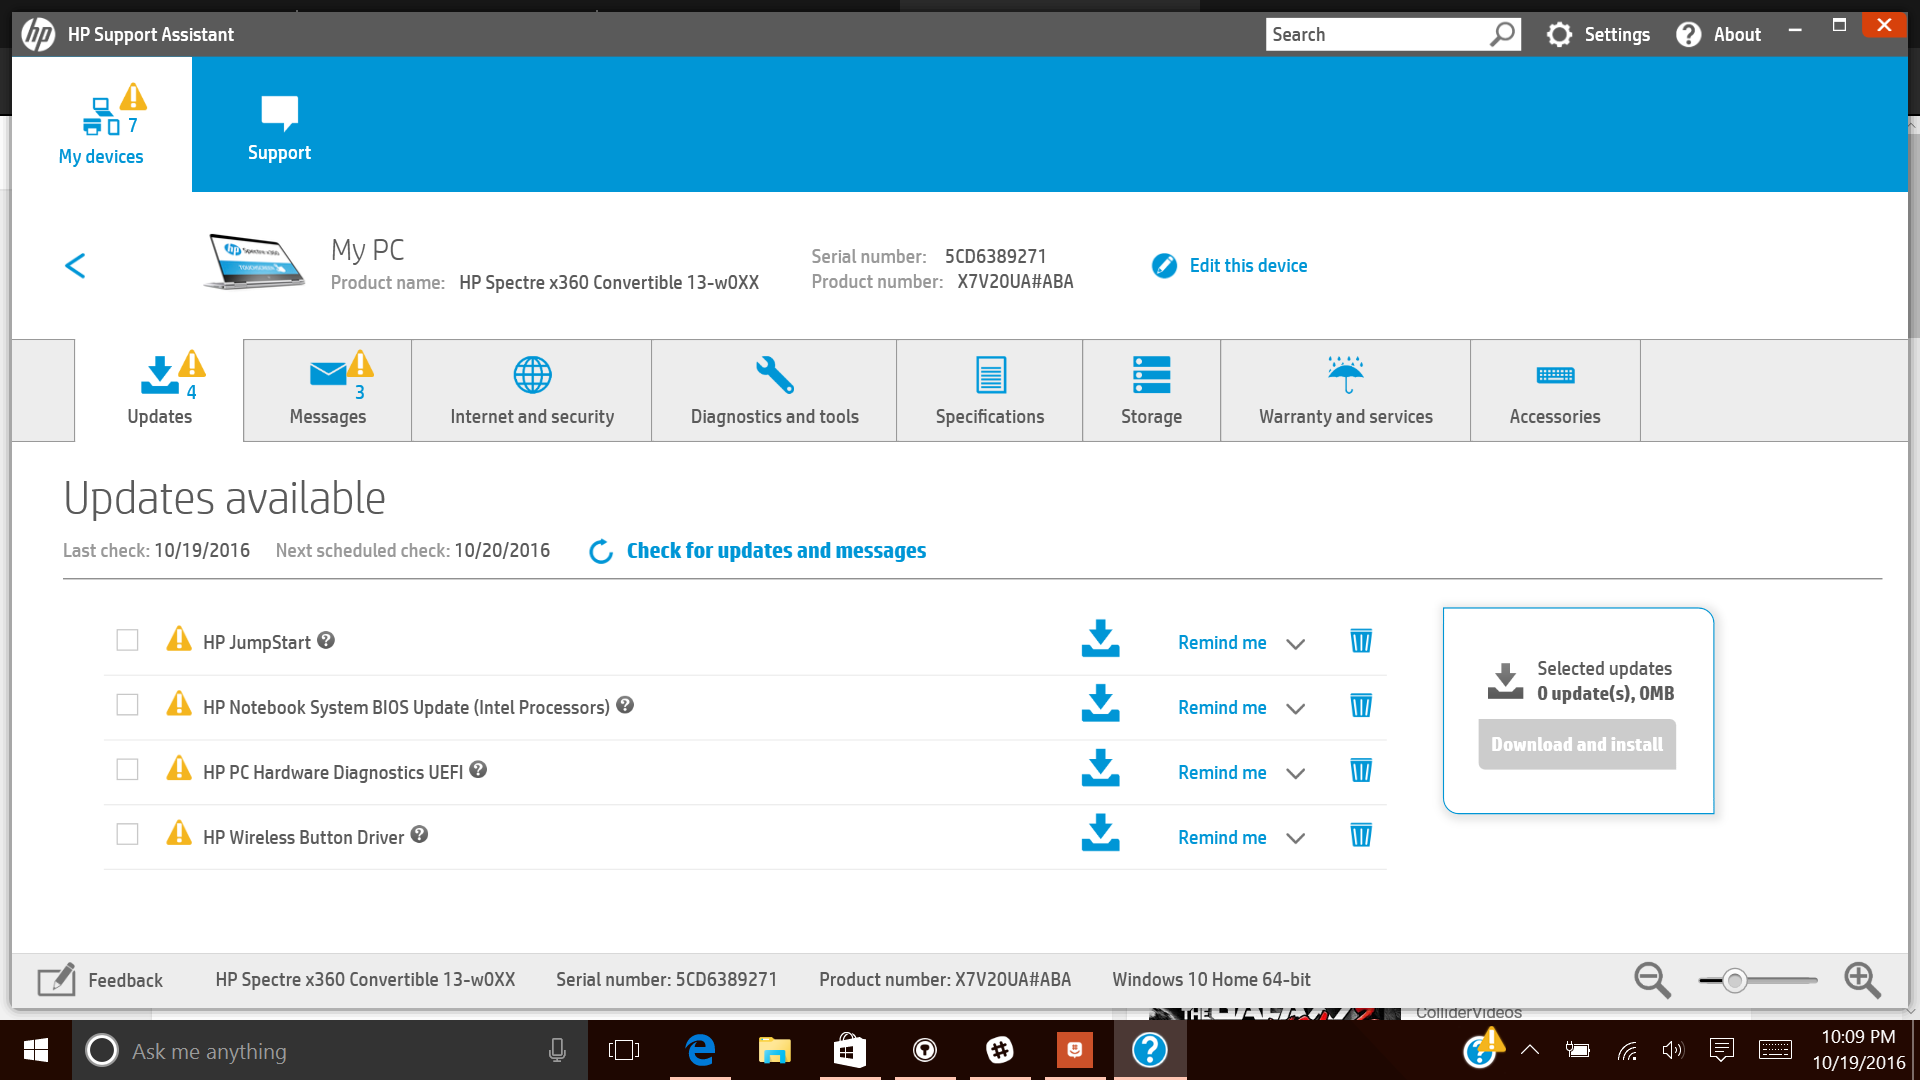 HP Support Assistant with new driver and BIOS updates
To check for updates simply open HP Support Assistant (the question mark icon in the task bar) and have it check for updates. If your Spectre x360 is new, there are likely other drivers updates that will be downloaded as well.
How to fix a disabled graphics card without a screen: removing the CMOS battery on desktop PCs
To fix an accidentally disabled graphics card, you’ll need to remove the CMOS battery. For desktop users, this will be a fairly easy task: simply ensure your machine is powered down and with all cables removed, then open up the case to reveal the hardware inside. If you’re unsure how to do this, refer to the manufacturer’s information, but be warned that doing so may void your warranty.

Once the internal components are accessible, you’ll need to find and remove the CMOS battery. Usually located in an exposed housing on the motherboard, this part looks like a large watch battery. Once found, you should be able to pop it out, but you may need to disengage some form of clipping mechanism first, depending on your PC.
Once the battery has been removed, wait for around one to two minutes. This should give the CMOS time to reset itself to its defaults. Then, replace the battery, reseal your computer’s case, and reboot your machine. Your BIOS should have reset itself, re-enabling your internal graphics in the process.
Update:
We now recommend using this tool for your error. Additionally, this tool fixes common computer errors, protects you against file loss, malware, hardware failures and optimizes your PC for maximum performance. You can fix your PC problems quickly and prevent others from happening with this software:
- Step 1 : Download PC Repair & Optimizer Tool (Windows 10, 8, 7, XP, Vista – Microsoft Gold Certified).
- Step 2 : Click “Start Scan” to find Windows registry issues that could be causing PC problems.
- Step 3 : Click “Repair All” to fix all issues.

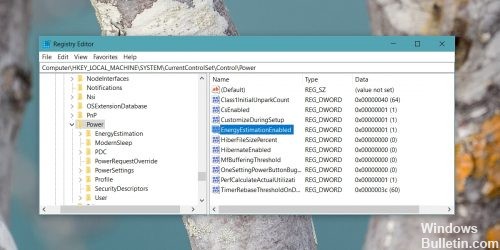
Use of the Registry
Warning : The registry editor is a powerful tool whose abuse can make your system unstable or even ineffective. It’s a pretty simple hack, and as long as you follow the instructions, you shouldn’t have any problems. However, if you have never worked with him before, you should consider how to use the registry editor before you start. And permanently save the registry (and your computer!) before making any changes.
Open the Windows registry by typing regedit in the Windows Search or Startup window. Navigate to the next location;
You have to look for things here. First look for a value called EnergyEstimationDisabled. If it exists, you must delete it. If you have difficulty deleting the value, you can set it to 0 and not delete it.
CONCLUSION
There are also several other options, including the standard performance system, such as the Performance (Standard) versus Balanced system. If battery life is longer for you, activating Balanced can give you extra longevity.
That’s it, that’s it! You now have a rough estimate of the remaining life of your battery. If you are disturbed by such micro-management of the battery, you can deactivate the function at any time and return to the standard percentage value.

CCNA, Web Developer, PC Troubleshooter
I am a computer enthusiast and a practicing IT Professional. I have years of experience behind me in computer programming, hardware troubleshooting and repair. I specialise in Web Development and Database Design. I also have a CCNA certification for Network Design and Troubleshooting.